일반적인 네트워크 카메라는 네트워크 대역폭 때문에 압축된 영상을 전송한다. 압축된 영상은 품질이 저하되기 때문에 영상 처리에 문제가 될수 있다. W5300 을 이용하여 압축되지 않은 원본 영상을 네트워크로 전송하고 영상 처리를 할 수 있는 카메라를 제작 하였다.
W5300은 80Mbps 이상의 고속 네트웍 전송이 가능하기 때문에 카메라의 실시간 원본 이미지를 전송하는데 가장 좋은 예가 될 수 있다.
전송된 영상은 일반적인 영상 처리 뿐 아니라 AI 를 적용하여 좀더 스마트한 어플리케이션에 적용 할 수 있도록 하였다.
AI를 적용한 네트워크 카메라는 실시간 감지와 분석을 통해 환경을 모니터링하고, 범죄 예방, 사고 감지, 자원 최적화 등 다양한 분야에서 중요한 역할 한다. 이를 통해 더 스마트하고 안전한 환경을 조성하며, 효율적인 보안 및 모니터링 시스템을 구축할 수 있다.
테스트 동영상
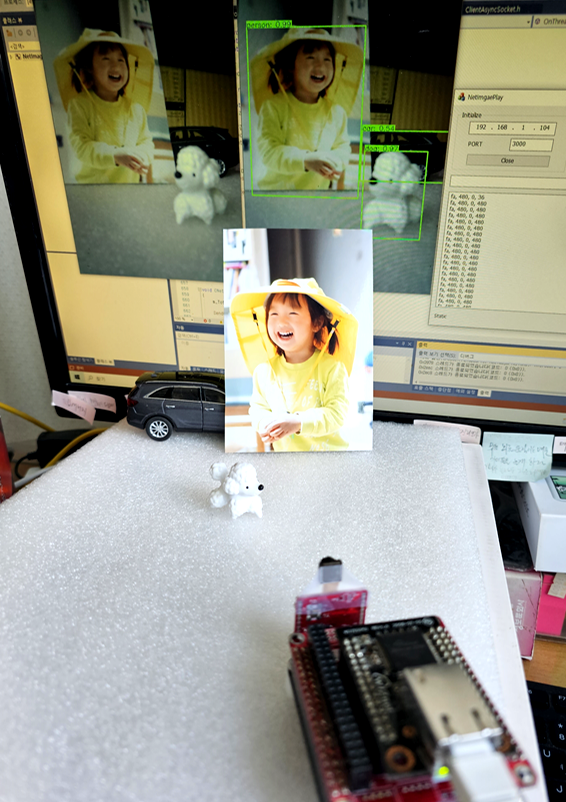
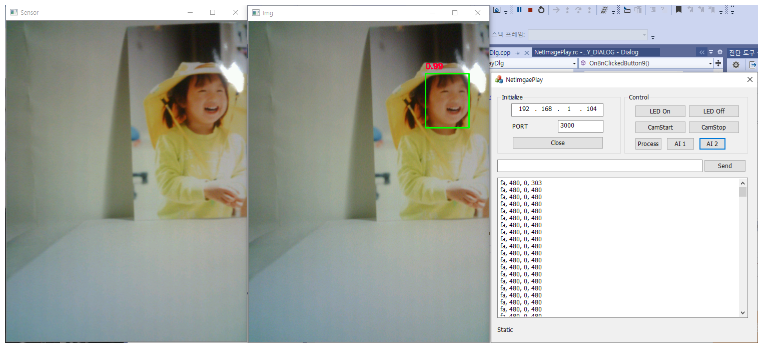
W5300 네트웍 카메라를 이용한 실시간 DNN 처리 결과
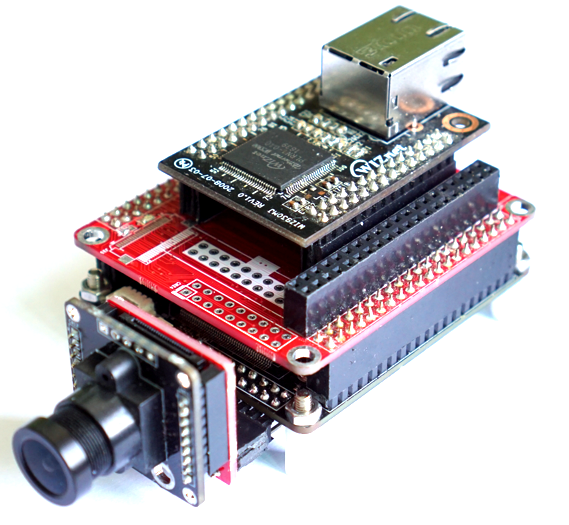
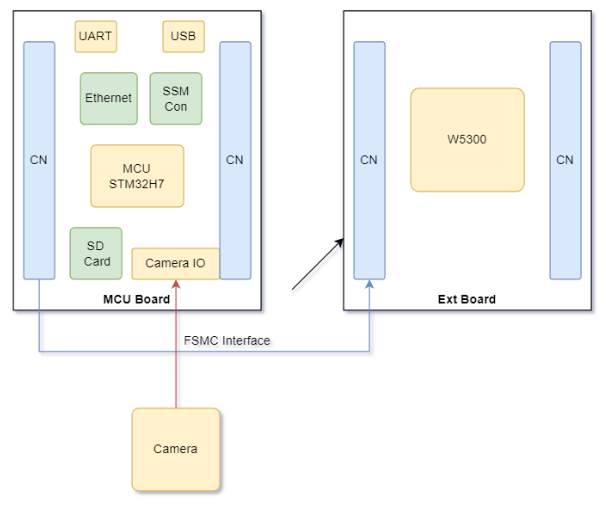
Hardware
사용된 MCU는 480Mhz로 실행되는 STM32H743이다. W5300의 인터페이스는 주소/데이터 버스이기 때문에 카메라 인터페이스와 함께 데이터 버스를 제공하는 STM32H7 시리즈의 STM32H743을 MCU로 선택 했다.
STM32는 동일한 핀 맵으로 더 높은 성능으로 쉽게 확장할 수 있다.
Firware
네트워크 속도
W5300을 이용한 네트워크 전송률을 확인하기 위해 iperf 프로그램을 사용하였고 테스트 결과 90Mpbs 로 측정 된다.
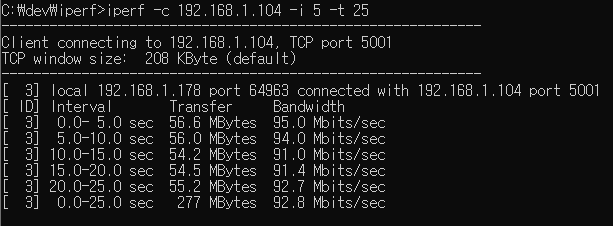
참고 : STM32H7 W5300 iperf TCP 전송률 테스트 - 최대 성능 끌어 올리기
이미지 전송
카메라 모듈에서 발생하는 라인 및 프레임 인텁트 신호에 따라 라인별 이미지 데이터를 전송한다.
  while (1)
  {
    /* USER CODE END WHILE */

    /* USER CODE BEGIN 3 */
		ProcessCamTcps(_CAM_SOCK_NUM, ethBuf0, dDestport);

		//send line when line interrupt signal occurs
	  	if(gCameraFrameFlag>0)
	  	{
	  		gCameraFrameFlag = 0;
	  		CamImagTransferFrame(_CMD_CAM_FRAME, gLineCnt);

	  		printf(">%d, %d\r\n", gFrameCnt, gLineCnt);
	  		printf("-------------------\r\n");
	  		gFrameCnt++;
	  		gLineCnt = 0;
	  	}

		//send frame when frame interrupt signal occurs
		if(gCameraLineFlag>0)
		{
			gCameraLineFlag = 0;

			CamImagTransferLine(_CMD_CAM_LINE, gLineCnt);
			gLineCnt++;
		}
  }
PC 소프트웨어는 W5300 네트워크 카메라서버에서 영상을 전송받고 출력하며 영상처리 알고리즘을 적용하는 소프트웨어 이다. 그리고 딥러닝 알고리즘을 적용하여 객체를 찾고 다양한 적용을 할 수 있다.
기본적인 네트워크 영상 출력
TCP 클라언트로 동작하며 W5300 네트워크 카메라 서버로 부터 전송 받은 영상을 출력한다.
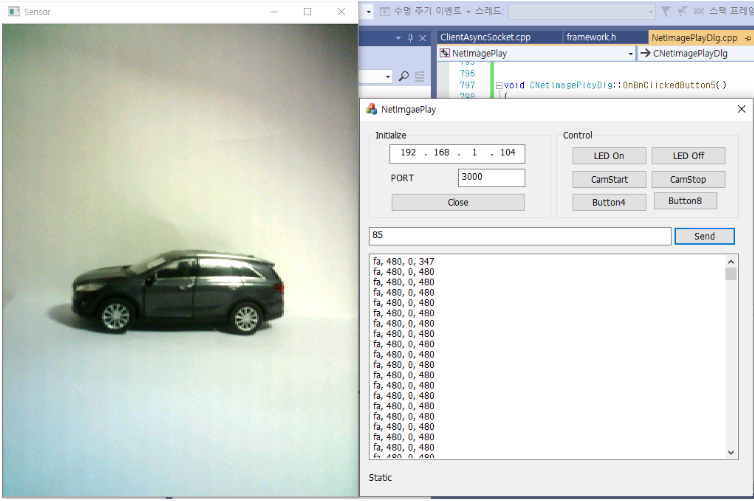
네트워크로 데이터가 수신되면 커멘드에 따라 라인별로 이미지 버퍼에 저장 한다.
int CNetImagePlayDlg::OnReceive(unsigned char* pDataBuffer)
{
	int cmd;
	int i;
	int page = 0;

	unsigned int size = _IMAGE_SIZE_X * 2 * _UDP_TX_BUF_RATE;

	cmd = pDataBuffer[0];
	page = pDataBuffer[2] << 8 | pDataBuffer[3];

	unsigned short data;
	int index = 0;


	if (cmd == _CMD_CAM_LINE)
	{
		if (m_gCamBufferIndex < _IMAGE_SIZE_Y)
		{
			memcpy((unsigned char*)&gImageBuffer[m_gCamBufferIndex * _IMAGE_SIZE_X * 1 * _UDP_TX_BUF_RATE], (unsigned char*)&pDataBuffer[4], _IMAGE_SIZE_X * 2 + _UDP_TX_BUF_RATE);
			m_gCamBufferIndex++;
		}
	}
	else if (cmd == _CMD_CAM_FRAME)
	{
		{
			str.Format(L"%x, %d, 0, %d", cmd, page, m_gCamBufferIndex);
			gstr_buf += str + L"\r\n";

			SetDlgItemText(IDC_EDIT2, gstr_buf);

			m_gCamBufferIndex = 0;

			DisplayCamImag(gImageBuffer, _IMAGE_SIZE_Y, _IMAGE_SIZE_X);
			memset(gImageBuffer, 0, _IMAGE_SIZE_X * 1 *_IMAGE_SIZE_Y);
		}
	}
	return 0;
}
이미지 출력 및 영상 처리는 쓰레드를 생성해서 실시간으로 처리 할 수 있도록 구현했다.
int CNetImagePlayDlg::OnThreadProc()
{
	Mat gray_image;
	Mat in_image;

	cv::rotate(m_DisplayImg, in_image, ROTATE_90_COUNTERCLOCKWISE);
	cv::waitKey(10);

	if (gFlag_Ai == 1)
	{
		//image precessing1..
	}
	else if (gFlag_Ai == 2)
	{
		//image precessing2..
	}
	else if (gFlag_Ai == 3)
	{
		//image precessing2..
	}
	else imshow("Sensor", in_image);

	return 0;
}
Digital Image Processing
전송 받은 영상을 이용하여 간단한 영상 처리 알고리즘을 적용한다.
OpenCV 가 제공하는 이미지 윤곽선 추출 함수를 이용하여 윤곽선을 추출하고 경계선을 표시하는 예제를 적용하였다.
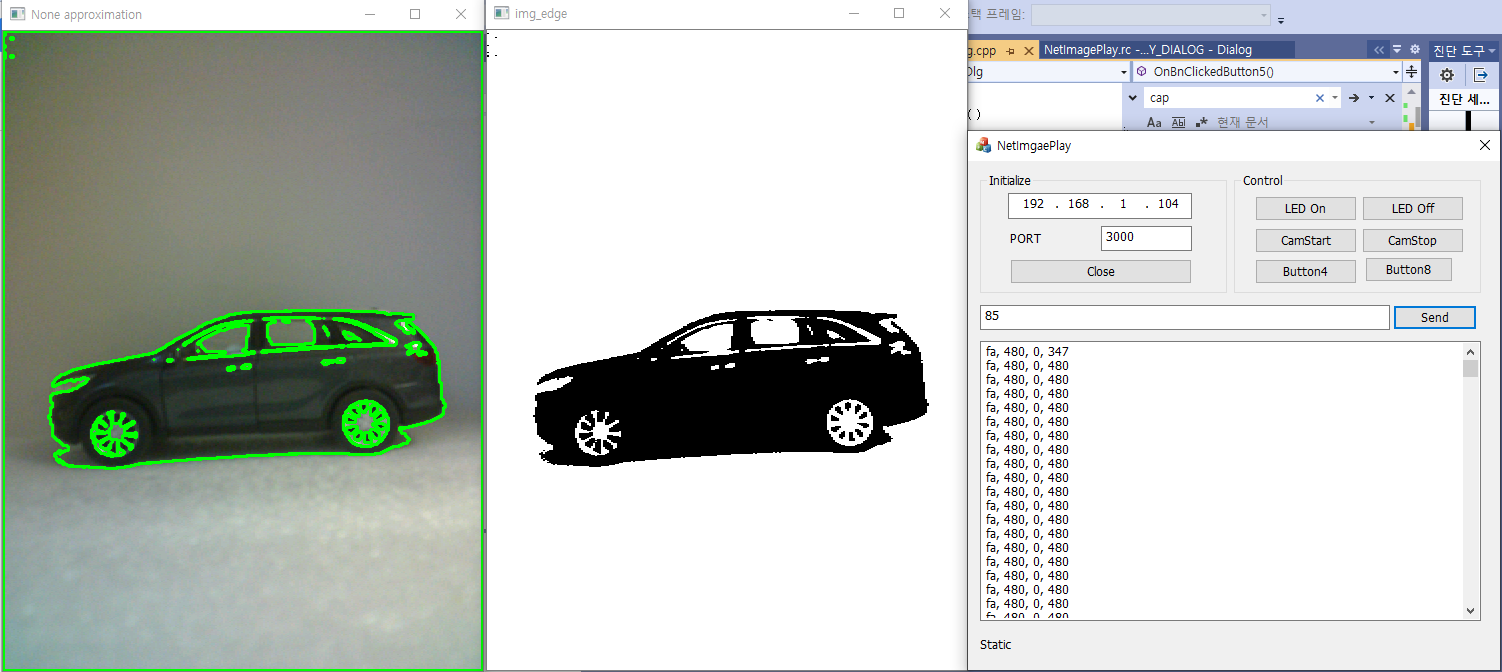
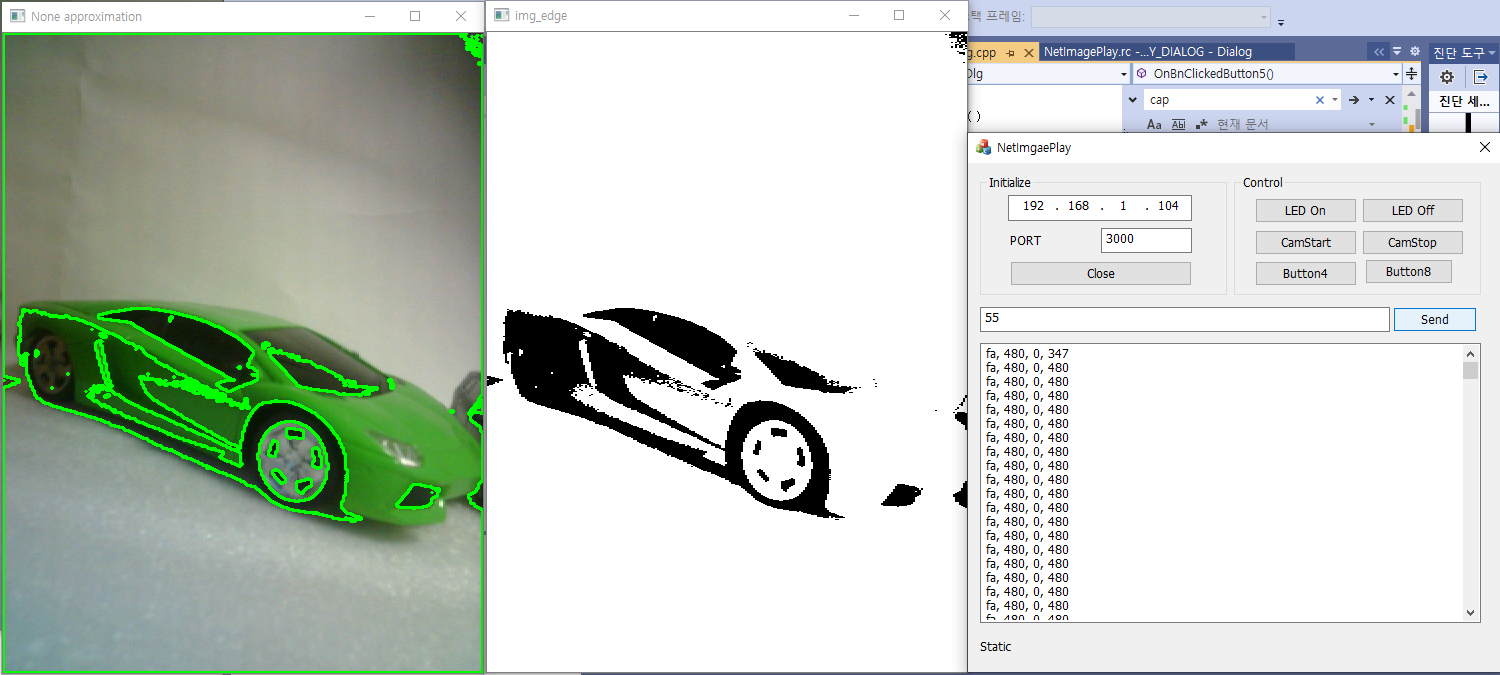
윤곽선 추출 테스트 코드
    Mat img_edge;

	//convert image from grey to color
    cvtColor(in_image, gray_image, COLOR_BGR2GRAY);


    Mat thresh;
    threshold(gray_image, thresh, gThrVal, 255, THRESH_BINARY);

    imshow("Sensor", thresh);

    // detect the contours
    vector<vector<Point>> contours;
    vector<Vec4i> hierarchy;
    findContours(thresh, contours, hierarchy, RETR_TREE, CHAIN_APPROX_NONE);

    // draw contours on the original image
    Mat image_copy = in_image.clone();
    drawContours(image_copy, contours, -1, Scalar(0, 255, 0), 2);
    imshow("result", image_copy);
AI 영상 처리(딥러닝)
딥러닝 프레임워크는 Caffe 를 사용한다.
Caffe는 오픈소스 딥러닝 프레임워크 중 하나이며, TensorFlow, PyTorch, Darknet 등 다양한 프레임워크가 존재한다.
OpenCV DNN 알고리즘으로 객체 인식/분류하는 예제
간단한 테스트를 위해 하기 네트워크를 사용하였다.
https://github.com/PINTO0309/MobileNet-SSD-RealSense/tree/master/caffemodel/MobileNetSSD

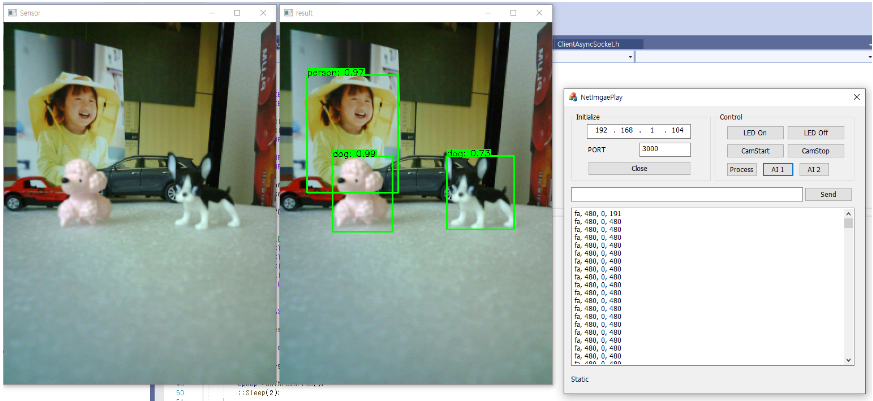
객체 검출 및 표시 테스트 예제
    //Loading deep learning models
    Net net = readNetFromCaffe("MobileNetSSD_deploy.prototxt.txt", "MobileNetSSD_deploy.caffemodel");

    //object detection
    Mat blob = blobFromImage(in_image, 0.007843, Size(300, 300), Scalar(127.5, 127.5, 127.5));
    net.setInput(blob);
    Mat detection = net.forward();

    //Output detected object information
    Mat detectionMat(detection.size[2], detection.size[3], CV_32F, detection.ptr<float>());
    for (int i = 0; i < detectionMat.rows; i++)
    {
        float confidence = detectionMat.at<float>(i, 2);

        if (confidence > 0.4)
        {
            int id = (int)(detectionMat.at<float>(i, 1));
            int x1 = static_cast<int>(detectionMat.at<float>(i, 3) * in_image.cols);
            int y1 = static_cast<int>(detectionMat.at<float>(i, 4) * in_image.rows);
            int x2 = static_cast<int>(detectionMat.at<float>(i, 5) * in_image.cols);
            int y2 = static_cast<int>(detectionMat.at<float>(i, 6) * in_image.rows);

            //Display detected object locations
            rectangle(in_image, Point(x1, y1), Point(x2, y2), Scalar(0, 255, 0), 2);

            String label = format("%s: %.2f", obj_class[id].c_str(), confidence);

            int base;
            Size label_size = getTextSize(label, FONT_HERSHEY_SIMPLEX, 0.5, 1, &base);

            //Display the detected object box, type, and accuracy
            rectangle(in_image, Point(x1, y1 - label_size.height), Point(x1 + label_size.width, y1), Scalar(0, 255, 0), -1);
            putText(in_image, label, Point(x1, y1), FONT_HERSHEY_SIMPLEX, 0.5, Scalar(0, 0, 0), 1);
        }
    }

    //Output the resulting image
    imshow("result", in_image);
OpenCV DNN Caffe모델로 얼굴 영역 탐지하는 예제
https://github.com/keyurr2/face-detection
결론
W5300은 하드웨어 고속 네트워크 솔루션으로 저렴한 MCU에서 네트웍 성능을 보여주는 탁월한 칩셋인것 같다. 특히 원본이미지를 처리해야 하는 이미지 프로세싱 어플리케이션에서 고속 데이터 전송을 쉽고 간단하게 처리 할수 있어 너무 좋은것 같다.
프로젝트 소스코드


