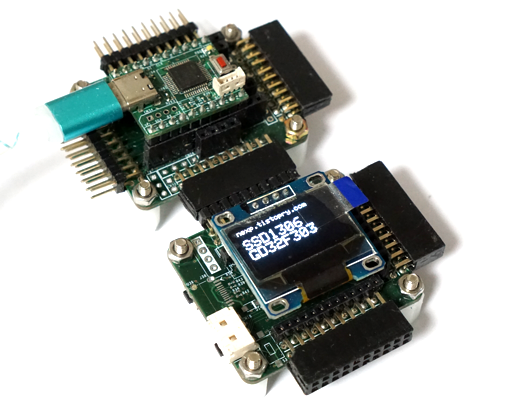
SSD1306 라이브러리(Adafruit_SSD1306) 기본예제를 수정해서 간단히 OLED에 출력하는 예제를 구동하면 정상 동작하는 것을 확인 할 수 있다.
#include <SPI.h>
#include <Wire.h>
#include <Adafruit_GFX.h>
#include <Adafruit_SSD1306.h>

#define SCREEN_WIDTH 128 // OLED display width, in pixels
#define SCREEN_HEIGHT 64 // OLED display height, in pixels

// Declaration for an SSD1306 display connected to I2C (SDA, SCL pins)
#define OLED_RESET     -1 // Reset pin # (or -1 if sharing Arduino reset pin)
Adafruit_SSD1306 display(SCREEN_WIDTH, SCREEN_HEIGHT, &Wire, OLED_RESET);
#define NUMFLAKES     10 // Number of snowflakes in the animation example


void setup() {

  Serial.begin(115200);

  // SSD1306_SWITCHCAPVCC = generate display voltage from 3.3V internally
  if(!display.begin(SSD1306_SWITCHCAPVCC, 0x3C)) {
    //Serial.println(F("SSD1306 allocation failed"));
    for(;;); // Don't proceed, loop forever
  }


  // Show initial display buffer contents on the screen --
  // the library initializes this with an Adafruit splash screen.
  display.display();
  delay(2000); // Pause for 2 seconds

  // Clear the buffer
  display.clearDisplay();

  // Draw a single pixel in white
  display.drawPixel(10, 10, WHITE);
}


#define YELLOW 0xFFE0

void loop()
{
    display.clearDisplay();
    display.setTextSize(1);
    display.setTextColor(WHITE);
    display.setCursor(0,0);
    display.println("nexp.tistopry.com");
    display.println(" ");
    display.setTextColor(INVERSE);
    display.setTextSize(2);
    display.println("SSD1306");
    display.println("GD32F303");
    display.display();
    delay(250);
}
반응형


